How to Use a Wood Stud Finder: The Complete UK Guide to Finding Wood for Stud Wall Projects
A practical, step-by-step guide for UK DIYers on using a wood stud finder to locate timber behind plasterboard, lath-and-plaster, and harling finishes — covering stud wall construction, detector types, and real-world tips from hands-on experience.
What Is a Wood Stud Wall?
A wood stud wall is a timber frame structure covered with plasterboard, forming internal partition walls in most UK homes built after the 1930s. The frame typically consists of vertical timber studs (usually 38mm × 89mm or 38mm × 63mm CLS timber) spaced at 400mm or 600mm centres, with a head plate at the top and a sole plate at the bottom.
I've been doing bits of DIY around my place near Madrid Street in Belfast for years now. The older terraces round here have a real mix — solid brick on the outside, but internal partitions are almost always stud walls. Knowing what's behind your plasterboard isn't just useful. It's essential if you don't want a shelf crashing down at 2am.
Standard UK Stud Wall Construction
In a typical UK stud wall, you'll find:
- Vertical studs: 38 × 89mm CLS timber at 400mm or 600mm centres
- Noggings: Horizontal braces between studs, usually at 1200mm height intervals
- Head and sole plates: Horizontal timbers at ceiling and floor level
- Plasterboard covering: 12.5mm standard or 15mm acoustic grade
The gap between studs is typically hollow or filled with insulation — mineral wool being the most common in UK builds. This hollow cavity is exactly why a wood stud finder becomes necessary. You can't see what's behind there, and guessing leads to missed fixings or, worse, drilled cables.
Why You Need to Find Studs Before Drilling

Locating timber studs is critical for secure wall fixings. A standard plasterboard wall can only support around 3–5kg per fixing point without a stud behind it — that's barely enough for a small picture frame.
Heavy items need stud fixings. We're talking wall-mounted TVs (15–25kg), floating shelves with books (easily 20kg per shelf), kitchen wall units (30kg+ when loaded), and radiators. Try hanging any of those into thin air behind plasterboard and you'll have a disaster on your hands.
There's a safety angle too. The Health & Safety Executive reports hundreds of electrical injuries each year from people drilling into hidden cables. A decent wall scanner won't just find timber — it'll flag live wires and pipes as well. Honestly, I learned this the hard way when I nicked a cable hanging a mirror. Sparks everywhere. Never again.
What Happens Without a Stud Locator
The old "knock and listen" method? It works sometimes. But it's unreliable on thicker plasterboard, insulated walls, or anything with a skim coat over artex. You end up with a wall full of exploratory holes. Not ideal.
Types of Wall Scanners and Wood Stud Detectors
There are three main detection technologies used in stud finders sold in the UK, each with distinct strengths depending on your wall type and project needs.
Magnetic Stud Finders
The simplest type. These detect the steel nails or screws holding plasterboard to timber studs. They're cheap (£5–£15) but limited — they find the fastener, not the stud itself, so you're inferring the timber position. Fine for standard 12.5mm plasterboard. Useless on deeper finishes.
Electronic (Capacitive) Stud Finders
These measure changes in wall density by detecting shifts in capacitance. They can identify the edges and centre of timber studs directly. Most models detect wood up to 19–38mm deep. This is where the wood stud sensor category really shines for typical UK plasterboard walls.
Multi-Mode Wall Scanners
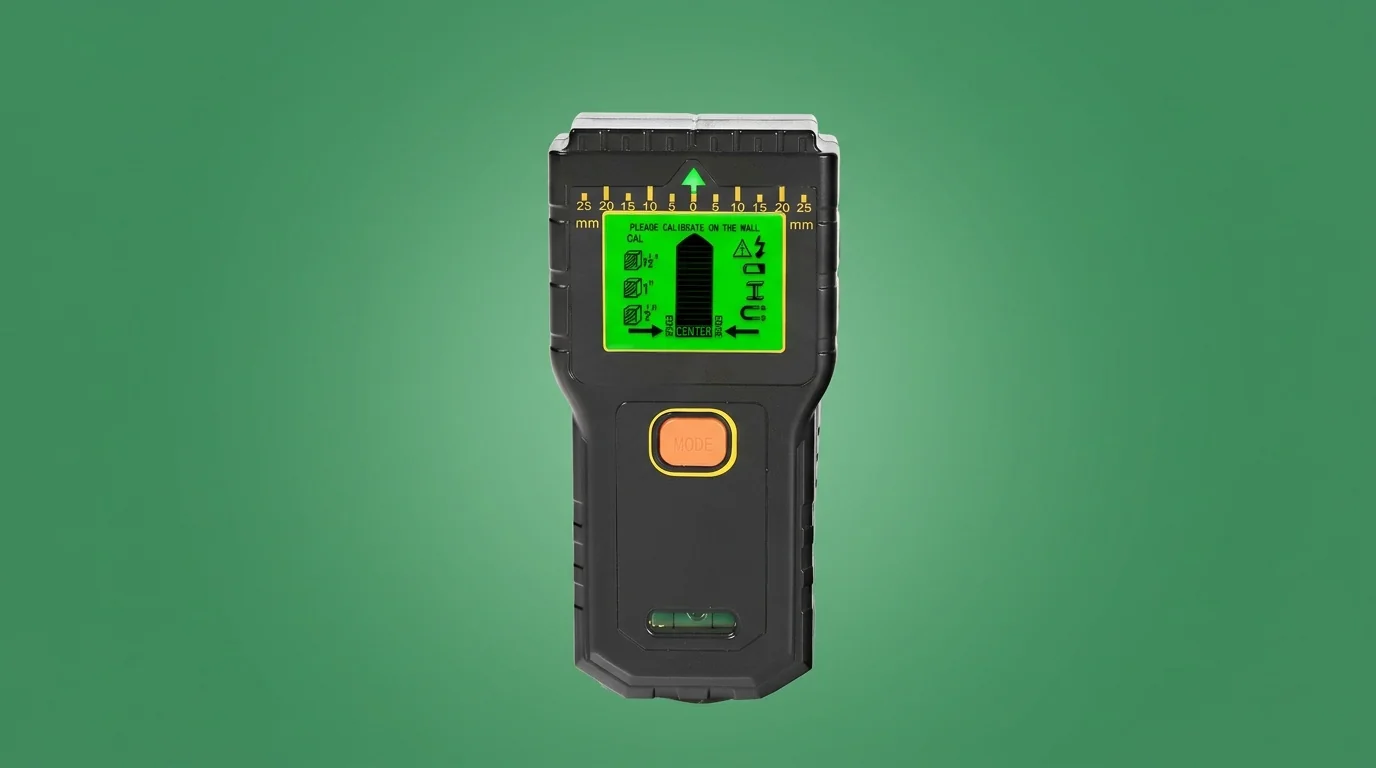
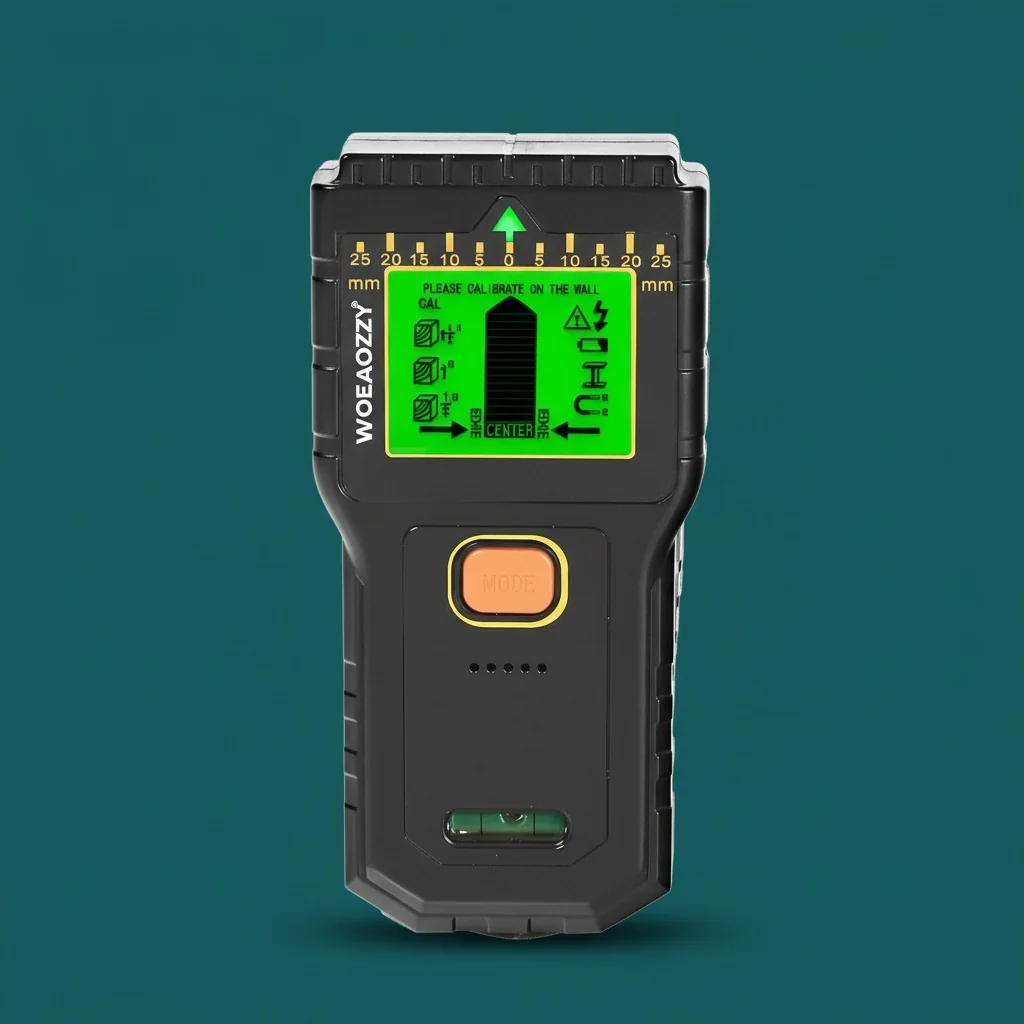
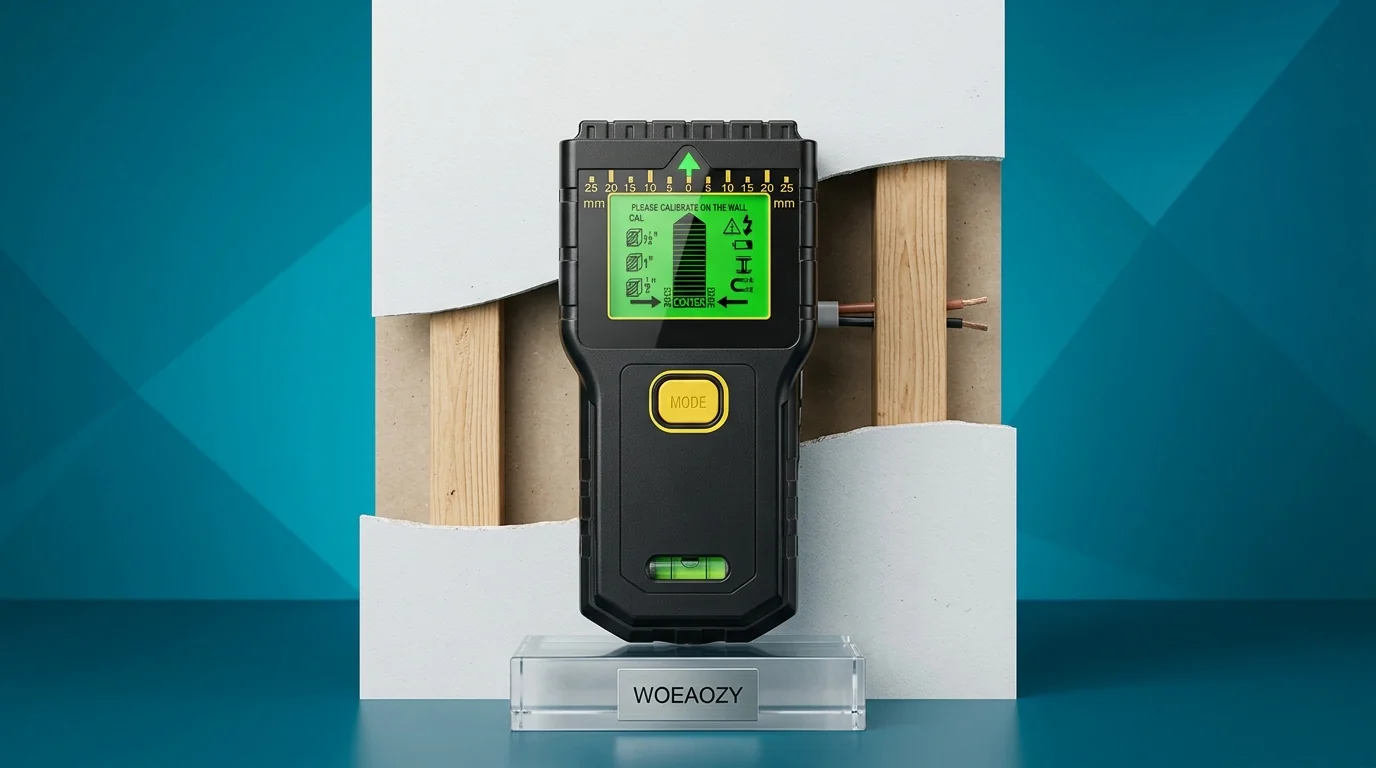
The best stud finder for serious DIY work combines multiple detection modes: wood/stud mode, metal mode, and AC wire detection. The WOEAOZY Wall Scanner at £32.51 is a solid example — it handles wood studs up to 38mm deep, ferrous and non-ferrous metals to 50mm, and live AC wires to 51mm depth. That covers pretty much every scenario you'll hit in a UK home.
Detection depth comparison (2026 models):
- Magnetic finders: surface fasteners only (0–13mm)
- Electronic stud finders: wood to 19–38mm
- Multi-mode scanners: wood 38mm, metal 50mm, AC wire 51mm
How to Use a Wood Stud Finder: Step-by-Step
Using a stud wood finder properly takes about 30 seconds per scan once you've got the technique down. Here's the method I use every time — it's reliable and avoids the false readings that frustrate most beginners.
Step 1: Prepare the Wall Surface
Remove any hanging items. Wipe the area clean — dust and wallpaper seams can cause false positives on capacitive sensors. If you've got thick wallpaper (common in older Belfast homes), you might need to press the scanner more firmly.
Step 2: Calibrate the Device
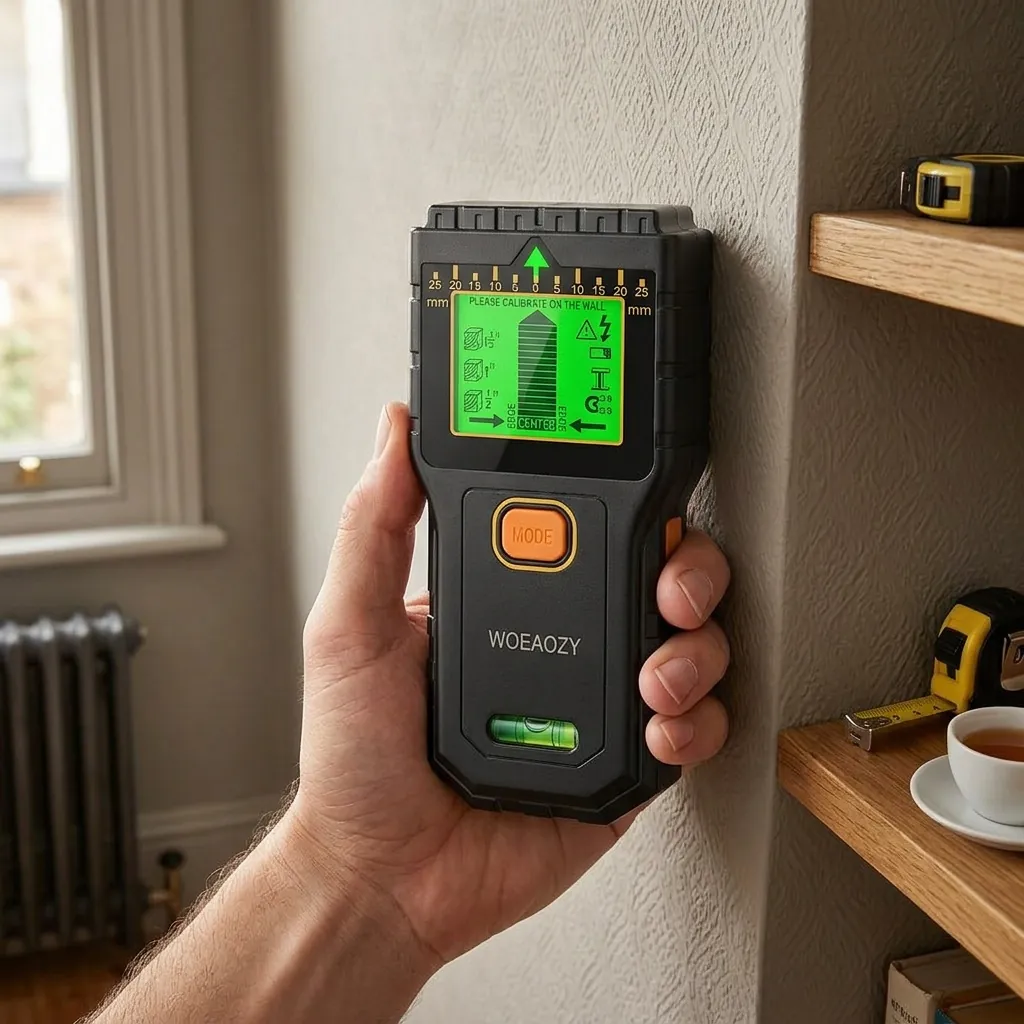
Place your wood stud locator flat against the wall in an area you believe is hollow (between studs). Press and hold the power/calibration button. Most devices need 1–2 seconds to calibrate against the "empty" wall reading. The WOEAOZY scanner gives a clear LED indication when calibration is complete.
Critical point: always calibrate away from corners. Corners almost always have timber behind them, which throws off the baseline reading.
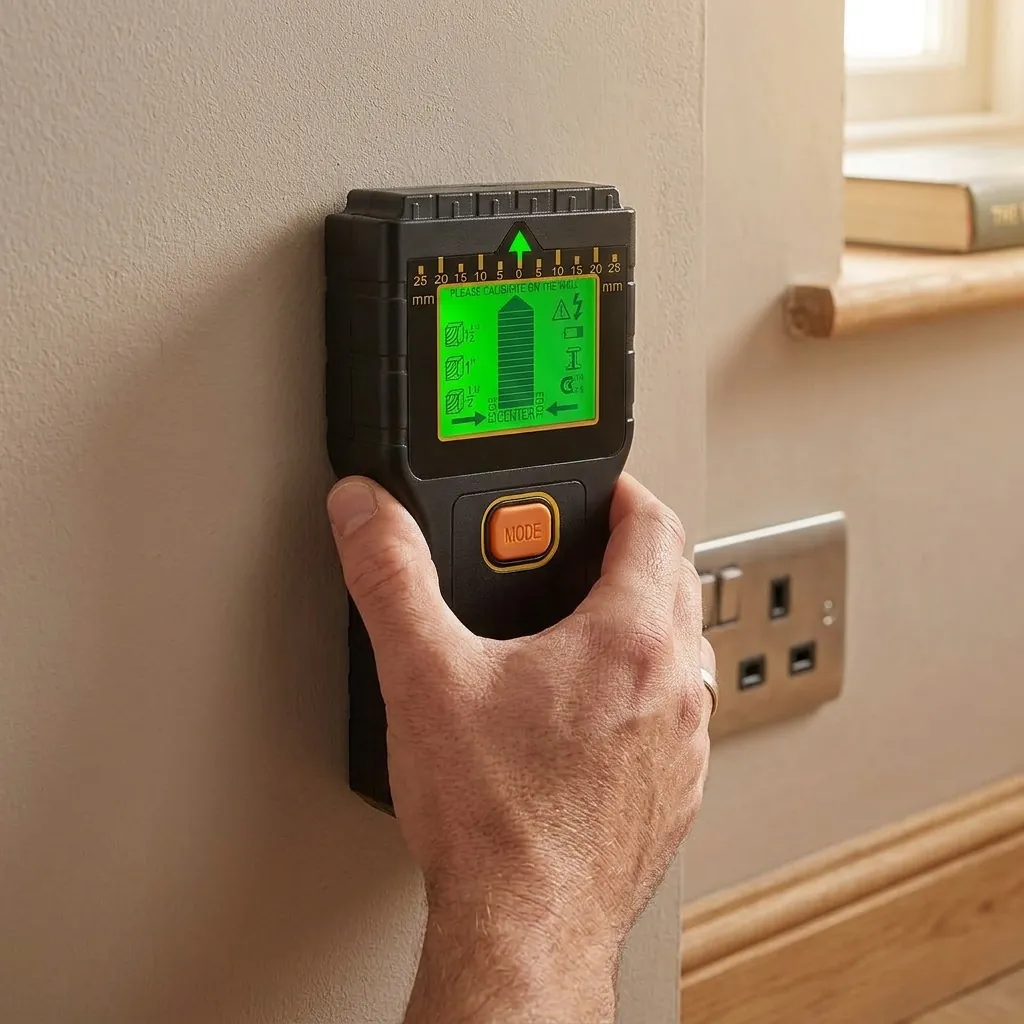
Step 3: Scan Slowly and Horizontally
Move the scanner horizontally across the wall at a steady pace — roughly 25–50mm per second. Too fast and you'll miss narrow studs. Too slow and some sensors drift. When the device signals a stud edge (usually a beep or LED change), mark it with a pencil.
Step 4: Find Both Edges
Approach the stud from the opposite direction to find the other edge. The centre point between your two marks is the middle of the stud. Standard UK studs are 38mm wide, so your marks should be roughly 38mm apart. If they're 89mm apart, you've likely found a doubled-up stud at a doorway or junction.
Step 5: Verify with a Second Scan
Run a vertical scan over your marked point. You should get a continuous reading if it's genuinely a stud running floor to ceiling. A short signal might indicate a nogging (horizontal brace) instead — still useful for fixings, but good to know.
Step 6: Confirm Before Drilling
Switch to AC wire detection mode and scan the fixing point. No signal? You're sorted. Mark it, drill a small pilot hole (2mm), and confirm you hit timber. You should feel resistance and see fine wood dust in the drill flute.
One thing worth mentioning — if you're getting inconsistent readings, try removing your hand from the wall. Some people rest their other hand on the surface while scanning, and body capacitance can interfere with cheaper sensors. The better-quality units like the WOEAOZY 7-in-1 stud finder handle this better, but it's still good practice. (Took me an embarrassingly long time to figure that one out, for the record.)
Dealing with UK Wall Types
UK homes throw up wall constructions you won't find in American DIY guides. Here's what you'll actually encounter and how to adapt your scanning technique., a favourite among Britain’s tradespeople
Standard Plasterboard on Timber Studs
The easiest scenario. 12.5mm plasterboard, 38mm studs at 400mm centres. Any decent wood stud detector handles this without fuss. Scan depth needed: 12.5–25mm.
Plasterboard on Dabs (Dot and Dab)
Common in homes built or renovated since the 1980s. Plasterboard is stuck to masonry walls with blobs of adhesive. There are no studs — the dabs themselves can trigger false readings. The catch is that you need a scanner that distinguishes between a solid dab and continuous timber. Multi-mode scanners handle this by showing the width of the detected object.
Lath and Plaster
Pre-1940s homes often have thin timber laths nailed across studs, covered in lime plaster. Total wall thickness can be 25–35mm. The laths themselves are wood, which confuses basic stud finders. You need a scanner with deep scan mode or adjustable sensitivity. Scan slowly and look for consistently stronger signals — that's your stud behind the laths.
Harling (Roughcast) Finishes
Particularly common in Scotland and Northern Ireland. Harling adds 15–20mm of cement render over the wall surface, which increases the detection depth required significantly. For harling over stud walls, you'll want a scanner rated to at least 38mm wood detection depth.
Required detection depths by UK wall type:
- Standard plasterboard: 12.5–15mm to stud face
- Plasterboard + skim coat: 15–18mm
- Lath and plaster: 25–35mm
- Harling over plasterboard: 30–40mm
Choosing the Right Wood for Stud Wall Extensions
If you're building a new stud wall — maybe partitioning a room or creating a home office — the timber you choose matters as much as finding existing studs.
CLS Timber (Canadian Lumber Standard)
This is the UK standard for stud walls in 2026. It's kiln-dried, stress-graded, and has rounded edges. Available in 38 × 63mm (for non-loadbearing partitions) and 38 × 89mm (standard internal walls). Expect to pay £2.50–£4.50 per 2.4m length depending on your timber merchant.
Treated vs Untreated
For internal stud walls, untreated CLS is fine. If your sole plate sits on a concrete floor (ground floor partitions), use tanalised timber to prevent moisture wicking. The British Standards Institution recommends treated timber for any application where moisture contact is possible (BS 8417).
Stud Spacing for Different Coverings
Your covering material dictates stud spacing:
- 12.5mm plasterboard: 600mm centres maximum
- 9.5mm plasterboard: 400mm centres
- Tile backer board: 300mm centres (bathrooms)
- Plywood sheathing: 400–600mm centres depending on thickness
Is the extra spend on closer spacing worth it? Absolutely, if you're planning to hang anything heavy later. My experience with 600mm centres in a utility room taught me that — ended up needing extra noggings for wall-mounted units anyway.
Wood Stud Finder Comparison: UK Models for 2026

I've used several stud finders over the past few years. Here's how the main options stack up for UK walls specifically.
| Feature | WOEAOZY Wall Scanner | Basic Magnetic Finder | Premium Bosch Wall Scanner |
|---|---|---|---|
| Price (2026) | £32.51 | £8–£15 | £80–£150 |
| Wood detection depth | 38mm | N/A (finds fasteners only) | 38–40mm |
| Metal detection | 50mm (ferrous & non-ferrous) | Surface only | 60mm |
| AC wire detection | 51mm | No | 50–60mm |
| Display type | LCD with signal strength | None (physical indicator) | Colour LCD |
| Suitable for lath & plaster | Yes | Limited | Yes |
| UK wall compatibility | Excellent | Basic plasterboard only | Excellent |
| Best for | DIYers wanting best value | Occasional light use | Professional tradespeople |
Look, I know the Bosch wall scanner gets recommended everywhere. And it's a brilliant tool. But at 3–5× the price of the WOEAOZY stud finder, you're paying for brand recognition and features most DIYers never use. For finding wood studs, detecting wires, and scanning for pipes in a typical UK home? The WOEAOZY at £32.51 does the job spot on. That said, if you're a full-time sparky or chippy scanning walls daily, the premium models earn their keep through durability alone.
The best home stud finder is ultimately the one you'll actually use before every drill. A £150 scanner gathering dust in a drawer is worth less than a £32.51 one that lives in your toolbox.
Frequently Asked Questions
How do I use a stud finder on plasterboard walls?
Place the scanner flat against the plasterboard, calibrate it in a hollow section, then move it horizontally at 25–50mm per second. Mark where the device signals a stud edge, approach from the opposite direction to find the other edge, and the centre point is your fixing location. Standard UK plasterboard is 12.5mm thick, so any scanner rated to 19mm+ will detect studs behind it reliably.
Can a wood stud finder detect pipes and wires too?
Multi-mode scanners like the WOEAOZY Wall Scanner (£32.51) detect wood studs to 38mm, metal pipes to 50mm, and live AC wires to 51mm depth. You'll need to switch between detection modes — wood mode for studs, metal mode for pipes, and AC mode for electrical cables. Always scan in AC mode before drilling any fixing point as a safety check.
What spacing are studs in UK walls?
UK stud walls typically have vertical timber studs at either 400mm or 600mm centres, measured from the centre of one stud to the centre of the next. Older properties (pre-1970s) often use 400mm spacing, while newer builds commonly use 600mm. Once you find one stud, measure 400mm or 600mm along to predict the next — then confirm with your scanner.
Do stud finders work through wallpaper?
Yes, most electronic stud finders work through standard wallpaper (0.5–1mm thick) without issues. Thick textured wallpaper, foil-backed wallpaper, or multiple layers can reduce accuracy or cause false readings. If you're getting inconsistent results, try pressing the scanner more firmly against the surface. Metallic or foil wallpapers will interfere with capacitive sensors — you may need to scan from an exposed section.
What's the best stud finder for UK homes in 2026?
For most UK DIYers in 2026, the best rated stud finder balances detection depth, multi-mode scanning, and value. The WOEAOZY Wall Scanner at £32.51 offers wood detection to 38mm, metal to 50mm, and AC wire detection to 51mm — covering standard plasterboard, lath-and-plaster, and even harling finishes. It's the best bang for your buck unless you need professional-grade features like radar scanning.
Why does my stud finder keep beeping falsely?
False readings usually come from three causes: calibrating over a stud instead of a hollow section, moving too slowly (sensor drift), or scanning over dot-and-dab adhesive blobs. Recalibrate in a confirmed hollow area, maintain steady movement speed of 25–50mm per second, and check whether your wall is dot-and-dab by tapping — a hollow drum sound between dabs is distinctive. Moisture in walls can also trigger false positives on cheaper sensors.
Key Takeaways

- A wood stud finder is essential for safe, secure wall fixings — plasterboard alone supports only 3–5kg per fixing point without stud backing.
- UK stud walls use 38mm timber at 400mm or 600mm centres — once you find one stud, you can predict the rest.
- Always calibrate your scanner on a hollow section away from corners, and scan horizontally at 25–50mm per second for accurate readings.
- Multi-mode scanners detect wood, metal, and live wires — the WOEAOZY Wall Scanner covers all three at £32.51, making it the best value electric wire detector for UK homes in 2026.
- UK wall types require different approaches — standard plasterboard needs 12.5mm detection depth, while lath-and-plaster and harling need 25–40mm.
- Always scan for AC wires before drilling — the HSE reports hundreds of electrical injuries annually from hitting hidden cables.
- For new stud walls, use CLS timber — 38 × 89mm for standard partitions, with tanalised sole plates on concrete floors per BS 8417.
Finding studs doesn't need to be complicated. With the right wood stud finder and proper technique, you can confidently hang heavy items, run new cables, or plan a stud wall extension knowing exactly what's behind your walls. I'd recommend starting with a multi-mode scanner — it covers every scenario you'll hit in a UK home and pays for itself the first time it saves you from drilling into a water pipe. My mate swears by the knocking method, and fair play, he's got good ears. But for £32.51, I'll take certainty over guesswork every time. Check out the full range at woeaozy.co.uk and get your walls sorted this spring.
Ready to try WOEAOZY?
Shop Now — £32.51